How to scan like a pro
Sunday, 9 November 2008
Scanners have been around for a long time, and today’s scanners are cheap, are fast, and produce high-quality output. Still, people haven’t figured how to make good scans—just take a look at scanned scores, manga, etc.—from their scanners.
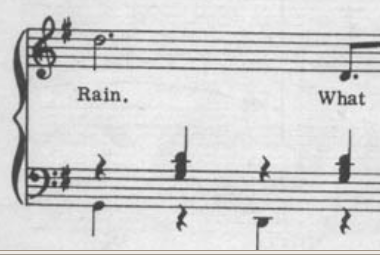
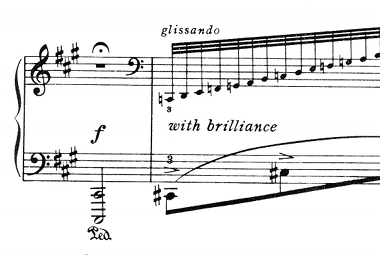
This means the difference between:

and

Guide follows:
Get a good scanner
Get a scanner that produces good output, comes with good software, and scans relatively fast. You don’t want to wait around forever when you’re scanning many pages. Even better, get one with a relatively large scanning bed. Many formats are larger than letter paper, and you don’t want to cut off part of the image or have to stitch images together.
Use good scan settings
- In your scanner software, set it to scan at a high-resolution (At least 300 ppi is the best for documents with detail. 200 ppi might suffice for simpler documents).
- For document type, choose either color or grayscale. It’s often better to convert the images to black and white later than at the scanning stage. It’s a one-way street. You might have to experiment a little with this: For one scanner I had, scanning in color and then converting to grayscale was better than scanning in grayscale to begin with.
- Choose a lossless file format. If your software supports it, choose PNG. Otherwise, choose TIFF or BMP. Avoid JPEG when dealing with documents: scanning software tend to produce poor-quality JPEGs, and it’s easy to accidentally save a grayscale JPEG as a color JPG. Not using JPG will avoid those oh-so-attractive blocky-blurry fuzzies around everything.
- Don’t use auto-crop. Manually set the scan size to the actual size of the paper before you scan. This will help produce consistently-sized images.
When scanning
- Make sure you know where the coordinate origin is. One corner of the flatbed will have an arrow indicating the upper-left boundary. Place the paper so that it perfectly fits into that corner. When scanning thick books, make sure you pay close attention to where the scanned page is, since the cover will move around.
- Scanner lids are detachable. If you’re scanning a thick book, detach the lid.
- Hold down the book! Either put the lid on the book and press down on the lid, or just press down on the book with your hand. This helps with printing near the spine and for pages that are bent or creased. Keeping the entire page flat is always better than having a large ugly gradient on one side.
Processing the files
- Keep all your source images! If you mess something up in post-processing, it is more convenient to simply start again with your source file, rather than re-scanning the page.
- Use consistent naming! Name your pages something like page01.png, page02.png, page03.png, etc. This will save much time.
- Convert all of your images to grayscale PNGs if they are not so already. Smart people can run
mogrify -format PNG -type Grayscale page*.pngif the pages are named page01.png, page02.png, etc. - Rotate the image if needed.
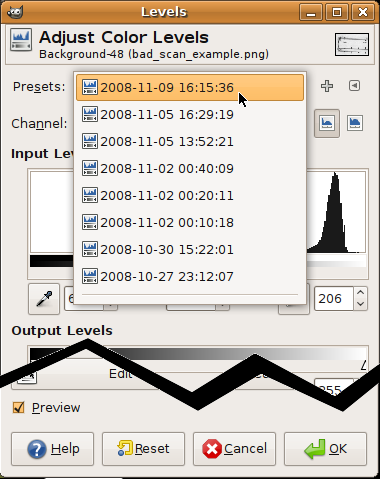
- Adjust your levels. You want to make the background solid white, not gray, and the black text and lines to be perfectly black, without destroying the image. Set your levels by using this guide:

The histogram represents how much of each color is in the image. Move the black slider to the peak (or slightly more to the right) that represents the majority of the black. Move the white past the large peak that represents the background white, so that almost all of it is cut off. - If you are using Adobe Photoshop, you can save the level adjustment by using the “Save” button in the Levels dialog. If you are using GIMP, your last used levels adjustment is saved and dated in the drop-down menu labeled “Presets.” Since you’re (hopefully) producing consistent scans, this will consistently and easily adjust the levels every time.
GIMP Levels dialog:

- Even better, if you’re using Adobe Photoshop, you can automate these actions. Open an unprocessed image. In the Actions window, make a new action. Photoshop will begin recording your actions. Do all your processing normally, and then hit the stop button in the Actions window. Now, close that file and open up all of your unprocessed files. Go to File→Automate→Batch…, choose your action, set it to run on your Opened Images, and let it get to work. Make sure it’s saving the files in the right place.
Compiling the Images
- If you’re smart, you’ll already have ImageMagick (try running “convert –version” to check). This suite of command-line tools (including the aforementioned “mogrify”) makes image processing easy. If not, you should download and install ImageMagick. Teaching you how to use your computer is beyond the scope of this article.
- This is the ideal scenario: You have a book scanned and processed as a series of 8-bit grayscale PNGs named book00.png, book01.png, book02.png, and so on. To create a nice PDF of this, simply run “convert book*.png book.pdf”. You are now a winner. (Note: older versions of ImageMagick produce broken PDFs. If you are unable to open your PDF in Adobe Reader, upgrade ImageMagick.)
- I haven’t tried this, but it is theoretically possible to install the PDFCreator printer driver and then use Windows Picture and Fax Viewer to print out all the images (at once) as a “Full page fax print” to PDFCreator. However, this will introduce extra margins and ignore your actual image size.
No. 1 — June 28th, 2011 at 09:05
Hi Eric, thanks for the very nice write-up and I chanced upon your blog while researching on the ideal file format for document scans.
I sense that you’re a proponent of the PNG format for storing scanned images. However, this seems to be against the convention where most people recommend TIFF instead due to its popularity, backward legacy support, good support in imaging and scanning software, and good bi-level image CCITT Group IV compression for b/w images such as black text document on white paper background.
According to this discussion thread on "Best format for scanning b&w text is PNG, TIFF, BMP or what? ", PNG is recommended only if there is an intention to publish the image scan on the web due to its web browser support, but for print purpose, stick to TIFF.
Any advice or knowledge to share if we are to compare PNG and TIFF for imaging or scanning?
No. 2 — June 29th, 2011 at 10:50
There’s nothing wrong with TIFF; it’s a great file format. My post focused on grayscale scans. Otherwise, CCITT G4 would be a great advantage. The advantages of “popularity, backward legacy support,” and “good support in imaging and scanning software” are not particularly important for me, as most tools work perfectly fine with PNG.
I’d say the major features of TIFF (versus PNG) would be multi-page documents, EXIF, and bi-level Group 4 compression. So yes, no particular reason to ditch TIFF for PNG.